Just a little caveat: I’m writing this post for those in our community who have never drawn or been frustrated by their past attempts at drawing, so I apologize to those of you who already have skills. However, I think there is something here for everyone - and besides a chance to draw is a chance to draw, right? If you have tips and tricks that you’d like to share with those in the community who are closer to the beginning of their drawing journey, please do so in the comments. It would be incredible if this post could serve as an ongoing resource for us all. xo
Hey, friends,
Hopefully, you are finding the prompts helpful in your journal practice. We’ve had some new people join us in the last week, so welcome, welcome!
For this week we are going to build on last week’s prompt and visually interpret our chosen subject. I am deliberately using “interpret” because I think that drawing can be stressful if you think you have to make a photocopy of what you see. But drawing doesn’t have to be like that - and drawing in a nature journal is certainly not that – it’s visual thinking.
Drawing is visual thinking.
Drawing to think
Much like last week’s writing to think, drawing is a visual method of sorting through information. As you draw you are focusing perhaps on textures or shape or color or size or scale – or all of the aforementioned – and you are making visual notes. You are documenting what the subject looks like to you and for you. Drawing is an expression of your visual experiences, and when combined with your written text is a profound expression of how you interpret the world.
Just like I broke up writing into reflective writing and communication writing, it’s the same for image making. You are drawing to think, and then later if you choose you can revisit your drawings to create an image that is meant to communicate your experience to others. So for now, please relax into this prompt.
I suggest you give your Inner Critic a crayon and tell it to write on the walls for a bit while you’re busy.
If you would like to watch a video of me demonstrating this process, that video will be in this weekend’s issue of the Tiny Owl Dispatch going out to my paid readers. You can upgrade your subscription – here – during my Substack-iversary sale this month for 30% off.
The Prompt
Make a journal entry using words and pictures.
Just like last week, chose a subject, get a pencil or pen, and your journal or a sheet of paper. Take a moment to sit with your subject. Look at it, turn it over if you can, and look at it from all sides if possible. Use INIWIRMO to help generate observations and questions about the subject. Let your curiosity lead you. Write notes and ruminate on what you see. Now you are ready to make an image.1
Now that we are looking at our subject through wonder-colored glasses, let’s make marks on the paper to represent our experience. I have a simple drawing process to share with you that I think will help you sift through an overwhelming amount of visual stimuli and translate a three-dimensional subject into a two-dimensional one with very little pain.
The Puzzle Approach
With the puzzle approach, you are looking at shapes as if they are pieces of a puzzle and determining how they fit together. We start with the biggest shape and work our way to the smallest shapes. Maybe there is a better analogy than a puzzle, but that’s what I came up with.
The Puzzle Approach works in all situations – drawing from life, from reference photos, videos, etc, and the beauty of it is that after a fair amount of use, your eyes will be trained to see shapes intuitively.
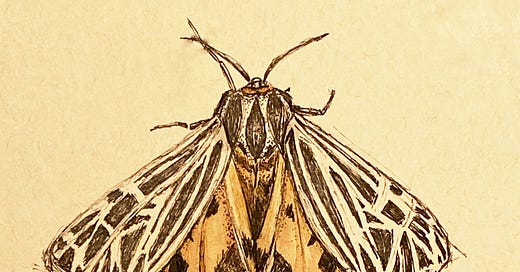
But first, here’s my reference. Bryan Pfeiffer of Chasing Nature has generously allowed me to use his fantastic menagerie of moths for illustrations this month.
Step 1: Start with the biggest shape
Determine the vertical space you want the subject to occupy on the page. Place two marks, each where you want the top and bottom to be, respectively. This is an arbitrary measurement but you’ll use it to determine the scale of the subject on the page.
Then compare the length/vertical with the width/horizontal of your subject. You can see from my drawing above that the width of the moth is two times the height, so using the size of the vertical space I wanted my drawing to occupy I double that to get the horizontal space.
Once I have the overall proportions (length to width) sorted and I like where my subject is placed on the page, I sketch in the basic and biggest geometric shape of my subject – in this case, a triangle. (You can see I ignored the antennae and legs at this stage.)
Step 2: Break the big shape into smaller shapes
I could see that this triangle could be broken up into a roundish shape with four long vertical shapes coming off of it. I eyeball where these lines go and sketch them in very lightly.
Once I have those rough shapes outlined (very lightly), I make adjustments using observation and relative measurements. At this point, I’m still keeping everything light, loose, and geometric.
The long vertical segments, which are shaped like blunt pie wedges, are equal fourths along the bottom of the triangle.
The length of the head is a third of the vertical centerline, and the wings meet up at the second-third point.
The head’s width is roughly the same as its height and is shaped like a diamond.
Step 3: Adding details
I start by adding more shapes inside the larger shapes.
I refine the larger shapes as I add more details. For instance, the large, outer triangle shape’s bottom corners need to be trimmed and rounded. At this point – the first image on the left (top image if you are on a phone) – I could have stopped. This was enough visual information to pair with writing notes for a nature journal page. Of course, I kept going…
and I add more shading with my pen before painting in a light wash of color.
Virgin Tiger Moth (Apantesis virgo)
I hope you’ll give the Puzzle Method a try. If it seems confusing or it just doesn’t jive with you, try it again. It is just one of many approaches, so take the bits that make sense and incorporate them into your nature journal practice. The rest can be “composted” – you never know when you may need it.
Let me know if you have questions. Enjoy!
xoSusannah
This is my 6-month Substack-iversary and to celebrate, during the month of July, I’m offering 30% off of all subscriptions for 12 months.
Why upgrade? In addition to the monthly post and weekly prompts you’ve come to love, you’ll also receive the Tiny Owl Dispatch twice a month. It’s more personal content about nature journaling in Acadia National Park and the surrounding area, my natural history illustration projects, and telling nature stories through words, pictures, and numbers. Plus you also get my “podcast” Cricklewood Campfire containing stories, folklore, and folksongs with a nature theme (of course!), and full access to the archive.
If you decide this is the right time for you to upgrade, I’m so grateful. Cricklewood keeps going with the support of its community. If this isn’t the best time, no worries – know that I treasure you and am so happy that you’re nature journaling with me!
For me, because I process my world visually first, the picture usually comes first or at least in tandem with words, so you choose what works best for you and your nature journaling practice.